Off-Grid Solar System Design & Installation Guide
Intro: When to choose off-grid solar
So, you’ve decided to start your journey to off-grid living -- congratulations! Installing an off-grid solar setup can be intimidating, so we’ve put together this complete guide to off-grid solar system design and installation to help guide your project.
Inside, you’ll find a complete overview of the process of going off the grid with solar, including detailed calculations to help you size an off-grid system that precisely fits your needs. We’ll also outline how to build an off-grid solar system that is safe and code-compliant.
Off-grid solar systems are not the same as grid-tie solar systems. With an off-grid system, you are entirely independent of the grid and 100% responsible for your power needs. You won’t be able to harness extra electricity from the utility company. Learn more about off-grid vs. grid-tie systems.
Off-Grid Solar System Components
Here’s a quick overview of the parts you can expect to find in your off-grid solar system. It’s important to pick components specifically rated for off-grid use. For example, most grid-tie inverters are not configured to connect to a battery bank.
Solar Panels
Solar panels absorb the sun’s rays, converting sunlight into DC (direct current) power.
While you may find that some panels are marketed as “off-grid solar panels,” this is a bit of a misnomer. There used to be panels that were designed to match the lower voltages of specific types of charge controllers and battery banks, but the technology has improved enough that the design standard has become outdated. Nowadays when a panel is marketed as "off-grid" it often means that the wattage is lower than the current standard, and many of the panels marketed this way tend to be of inferior quality.
Now, MPPT charge controllers allow us to make use of standard, mass-produced solar panels in off-grid applications. Any traditional 60/120 or 72/144 cell solar panel will work just fine, and if you have space on your property to mount full-sized panels, that will be your most cost-effective option.
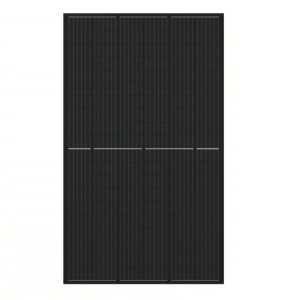
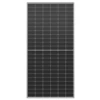
Common solar panel sizes:Both 60-cell and 120-cell solar panels are about 3.5 feet by 5.5 feet. The difference is that 120-cell panels utilize half-cut cells, which are slightly more efficient and resistant to failure.
72-cell and 144-cell solar panels are about 3.5 feet by 6.5 feet, with 144-cell panels using half-cut cells as well.
60/120-cell panels are easier to carry and offer more flexible design options, while 72/144-cell panels cost less to install. Compare 60/120 vs. 72/144-cell panels here.
Hanwha QCells 340W |
Phono Solar 400W |
|
|---|---|---|
Dimensions |
approx 3.5 ft x 5.5 ft |
approx 3.5 ft x 6.5 ft |
Efficiency |
Good (19%) |
Good (19.88%) |
Wattage |
340W |
400W |
Cost/Watt |
$0.90 |
$0.69 |
Warranty |
85% output / 25 years |
80.2% Output / 25yrs |
Weight |
44 lbs |
54 lbs |
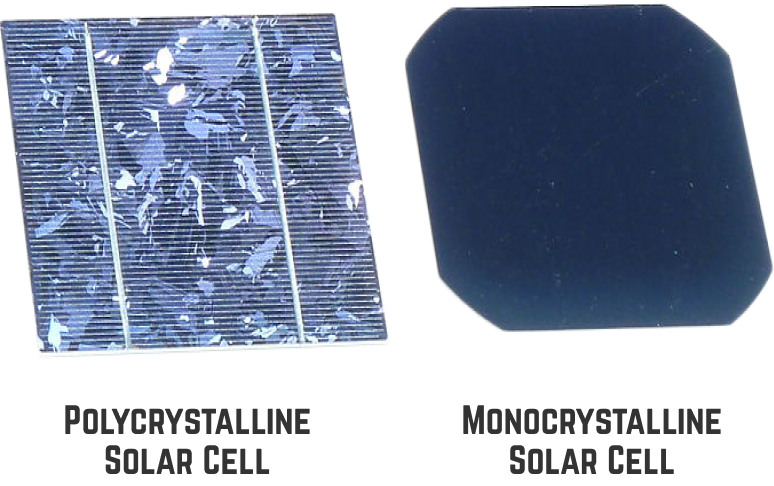
Monocrystalline (mono) solar panels are cut from a single section of silicon. They are slightly more efficient than polycrystalline (poly) solar panels, which contain cells made of blended fragments of silicon.
Mono solar panels cost a bit more than poly panels, because their increased efficiency allows you to fit more solar in a smaller space. In terms of performance, mono and poly solar panels will produce power equally well, but an array of poly panels would take up more room on your property.
Batteries
The centerpiece of off-grid solar systems. Batteries store the energy you produce. You can draw power from your battery bank to run your appliances at any time.
Off-grid solar systems use deep cycle batteries, which are designed to be discharged and recharged gradually. Typically solar batteries are sized to cover your energy usage for one night and recharge from solar during the day, completing one charge / discharge cycle over a 24 hour period.
Some common battery types used in off-grid solar applications:
Flooded Lead Acid Batteries
Flooded lead-acid (FLA) batteries are sometimes referred to as "wet cell" batteries because the electrolyte is in liquid form and can be accessed by removing the battery caps.
Charging flooded batteries causes water in the electrolyte solution to evaporate, so they regularly need to be refilled with distilled water to keep them topped off. This need for routine maintenance means flooded batteries are only suitable for those who have the time (and the desire) to perform maintenance checks on their battery bank on a monthly basis.
FLA batteries are especially prone to failure if not properly maintained, and we find that most people can't (or won't) commit to the monthly maintenance schedule needed to properly care for FLA batteries. Their strict maintenance requirements means they are not suitable for vacation homes, nor would we recommend them for full-time off-grid residences, unless you really love the idea of getting hands-on with your system.
Sealed Lead Acid Batteries
Sealed lead acid (SLA) batteries get their name because the compartment containing the electrolyte is sealed, which prevents leaks and noxious fumes coming from the battery.
Unlike flooded lead-acid (FLA) batteries, sealed batteries have minimal maintenance requirements and do not need to be installed in a ventilated battery enclosure. SLA batteries can also be mounted in any orientation, because the contents of the battery are sealed shut.
There are two sealed lead acid battery types: absorbent glass mat (AGM) and gel batteries.
- AGM batteries are less expensive and perform better than gel batteries in cold temperatures. They are also capable of higher charge and discharge rates. They are the more cost-effective sealed battery option, recommended in most off-grid solar applications.
- Gel batteries are an older technology that cost more than AGM batteries. They take longer to charge and are not as widely available as AGM. Gel batteries do perform better in high ambient temperatures, so they may make sense in hot climates, but AGM is usually the more cost-effective option.
Lithium Ion Batteries
Lithium Ion batteries tend to be about 3x the cost of SLA batteries, but they also last about 3x longer, so the higher initial cost balances out over the life of the system. (For a lifetime cost comparison chart, see the “Cost of Off-Grid Solar” section below.)
If you want a high performance battery that you don’t have to replace for a decade, lithium batteries are the most convenient option. They have faster discharge and recharge rates, weigh less and are maintenance-free. In addition, lithium batteries are modular, meaning you can start small and expand your battery bank as needed.
SAMPLE BATTERY BANK FOR 4KW SOLAR SYSTEM
BATTERY TYPE |
Flooded Lead-Acid |
Sealed Lead-Acid (SLA) |
Lithium Ion Phosphate (Li) |
battery manufacture/model |
Rolls S6 L16-HC |
Rolls S6-460 |
Fortress eFlex |
# of batteries |
8 |
8 |
3 |
Battery bank totalStorage Capacity |
21.4 kWh |
19.9 kWh |
16.2 kWh |
Battery bank usableStorage Capacity |
10.7 kWh @ 50% DoD |
9.9kWh @ 50% DoD |
12.9 kWh @80% DoD |
initial battery bank cost |
$2,800 |
$4,800 |
$11,550 |
10-yr battery bank cost of ownership |
$8,400 |
$14,400 |
$11,550 |
battery lifespan |
2,000 cycles @ 50% DoD |
1,200 cycles @ 50% DoD |
6,000 cycles @ 80% DoD |
warranty |
3 Years |
3 Years |
10 Years |
battery bank weight |
900 |
1008 |
348 |
maintenance requirements |
Frequent |
Minimal |
None |
depth of discharge (dod) |
30-50% |
30-50% |
80-90% |
temperature range |
-40 to 120°F (estimated) |
-40 to 120°F (estimated) |
Charging Temperature 32°F to 114°F Discharging Temperature -4°F to 131°F |
charge rate |
85A Max |
125A Max |
300A Max |
Off-Grid Inverters
The inverter is the central hub of the system, responsible for routing power between its various components. For off-grid solar, you need an inverter that is purpose-built for off-grid use.
State of the art off-grid inverters have a variety of capabilities and "smart" functions. MPPT charge controllers are built in to many inverters. Some not only accept generator power inputs, but can start the generator if battery power dips too low. Inverters include the "brain" for monitoring systems so that you can monitor your system remotely. And if you are using lithium batteries, many inverters can communicate directly with the battery's built in BMS (Battery Management System) in order to maintain proper charge levels and to make battery bank information available for your monitoring.
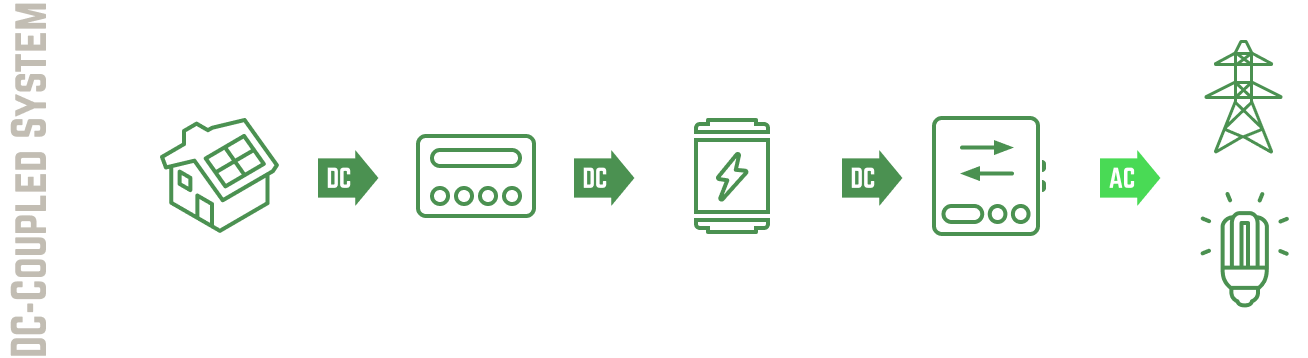
Your off-grid inverter takes low voltage DC power from the battery bank and converts it into 120/240V AC, the standard format that powers household appliances.
State of the art off-grid inverters offer several smart features to manage your system. A few examples include remote monitoring, automatic generator start, and the capability to communicate directly with lithium battery banks to monitor and maintain proper charge levels.
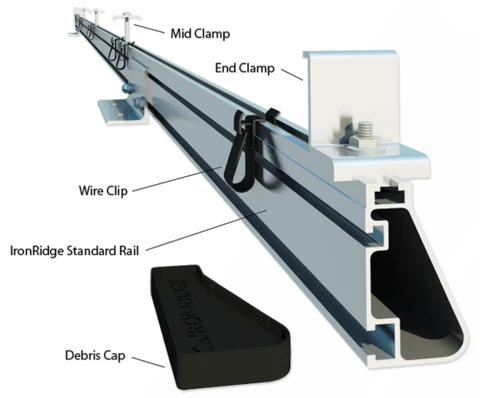
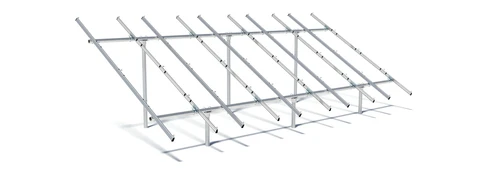
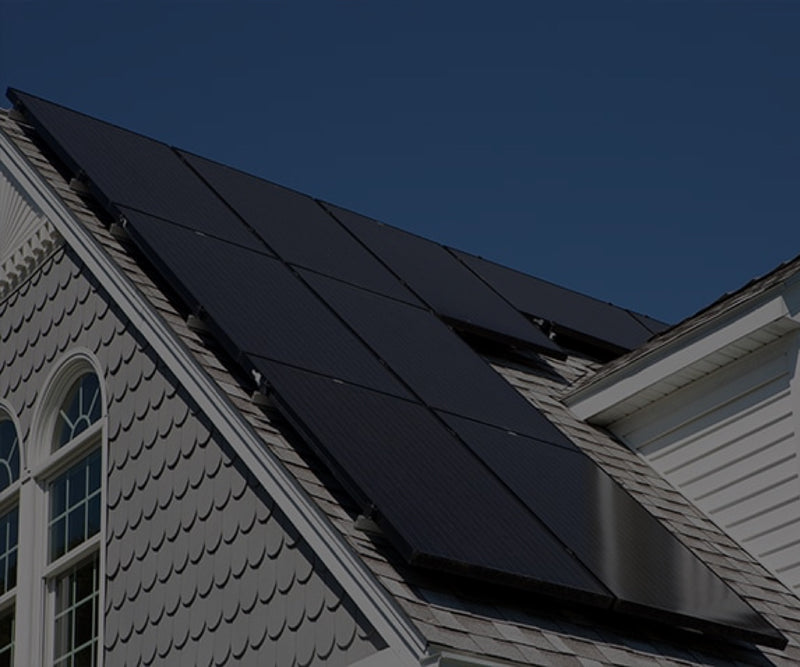
Racking
The foundation that supports your solar array. We recommend the Ironridge XR metal rail system.
Racking is universal between grid-tie and off-grid systems. There’s no special equipment; it’s just a metal structure that supports the weight of the solar array.
Both roof and ground mount racking works well, and there are pros and cons to both options. Take a look at our article comparing ground mount vs. roof mount solar if you’d like help deciding where to mount your array.
Charge Controllers
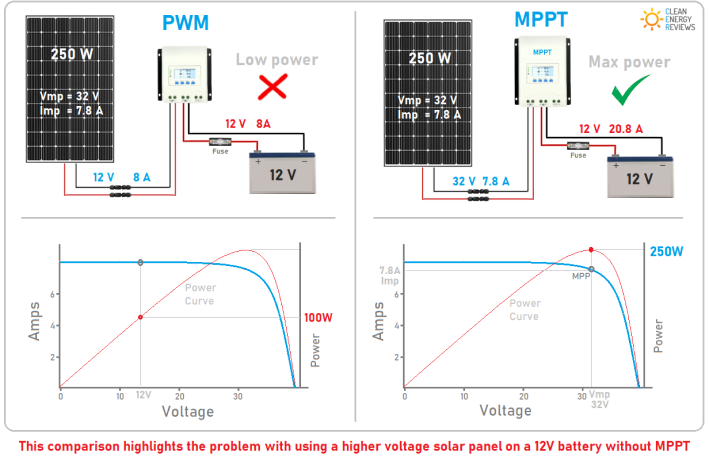
A solar charge controller regulates the battery charging process. Charge controllers keep solar panels from overcharging your battery bank by regulating the voltage the panels generate.
48-volt batteries are common in off-grid systems; however, most solar panels deliver more voltage than is required to charge the batteries. Charge controllers convert the excess voltage into amps, keeping the charge voltage at an optimal level while reducing the time necessary to charge the batteries fully.
Undercharging and overcharging both reduce the expected lifespan of your battery bank, so it’s important to pick the right controller and properly program the charging profile of the batteries.
There are two main types of charge controller: PWM (Pulse Width Modulation) and MPPT (Maximum Power Point Tracker).
- PWM controllers are an older technology that we do not recommend for off-grid homes. They are less efficient and have limited options for compatible solar panels. PWM controllers are better suited for less intensive applications, like remote telecom setups.
- MPPT controllers are a more efficient and reliable technology that maximizes the current running into the battery bank. As the intensity of sunlight changes throughout the day, MPPT controllers automatically adjust the voltage to charge the battery bank as efficiently as possible. We exclusively use MPPT charge controllers in our solar kits to meet the demands of full-time off-grid living.
Power Center
A power center is a pre-wired unit that contains the “brains” of the system -- the inverter, charge controllers, monitoring system, overcurrent / surge protection, AC and DC inputs/outputs, and wiring to tie it all together.
Buying a pre-wired power center, or a state of the art off-grid inverter that has most of these features built-in, saves the intricate work of correctly mounting and wiring a number of components together.
How much does it cost to go off grid with solar?
First, the standard disclaimer: every off-grid solar project is different, and your costs will vary (™). To put together a custom off-grid solar package that suits your needs, reach out to us for a free PV proposal.
However, it can be useful early in the research process to look at some sample systems to help benchmark the costs of off-grid solar. Feel free to take a look at our off-grid solar kits in our shop for up-to-date pricing.
Please note that the kits in our shop do not include the cost of batteries, as the battery bank will need to be sized to match your energy consumption (we’ll explain how to do that in the Off Grid Solar System Design section).
Tax Incentives & Polices by State
Find your state’s incentives and policies.You are eligible to claim the solar tax credit if:
- You owe taxes for the filing year that the system was installed
- The system is installed at your primary residence
- You are the owner of the system (leases / PPAs do not apply)
Backup Generator Costs
While solar can handle your day-to-day power needs, most off-grid systems are designed for a single day of autonomy (days that you can fully meet your energy needs with solar). You will inevitably encounter stretches of bad weather where your solar panels can’t produce enough power to cover your needs.
For that, off-grid systems must include a source of backup power. For most people, that means adding a backup gas generator to get through periods of low solar production.
Be sure to budget for a backup generator as part of the overall cost of your system.
off-grid systems must include a source of backup power. For most people, that means adding a backup gas generator to get through periods of low solar production.
Minimizing Off-Grid System Costs
Before you size your off-grid solar system, consider whether you can take measures to reduce your energy usage. Lower consumption means you can get away with a smaller battery bank and inverter, reducing system costs.
Two simple things to consider:
-
Propane Appliances
Consider outfitting your off-grid home with propane appliances to limit your electricity usage. We recommend looking for a propane stove, clothes dryer, wall heater and on-demand water heater; in our experience these are more cost-effective than running them off electricity.
Be sure that you have reliable access to a propane vendor near you. Some places have propane delivery services, which are convenient.
-
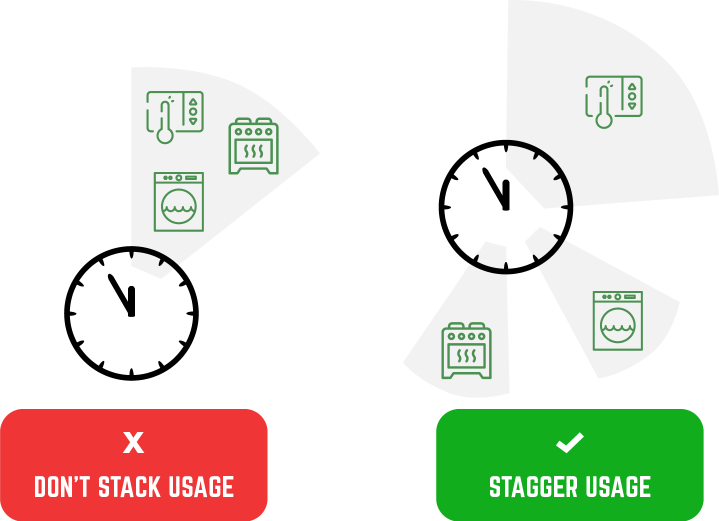
Stagger Appliance Usage
Usage Off-grid systems are designed with peak consumption in mind -- how many electrical loads are run simultaneously. By staggering your usage of major appliances, you can reduce the peak demand on your system.
For example, if you’re willing to run your dishwasher and laundry at different times, that will reduce peak demand and keep system costs in check.

Off-Grid Solar System Design
Off-grid living means you are fully responsible for your own power production; if your energy storage doesn’t live up to your needs, there’s no grid power to fall back on. For that reason, it’s critical to take all the factors that impact solar production into account during the system sizing process.
Factors that Impact Off-Grid System Design
Before we get into the system sizing process, consider the following:
-
 Sun Hours
Some parts of the country get more exposure to the sun than others. You’ll need to know how many sun hours you get in your location -- a measure of the duration and intensity sunlight in your region.
Fortunately there’s no guesswork involved, thanks to the solar insolation maps provided by the National Renewable Energy Laboratory (NREL). Look for the DNI (Direct Normal Irradiance) maps and take a note of the average sun hours in your location. Most places in the US fall in the range of 4-5 sun hours per day.
You may notice from the monthly maps that sun hour availability dips dramatically in the winter. Your solar production will fall below your needs in the winter months, and it will be up to your generator to pick up the slack.
While you could theoretically oversize your solar array so that it works in those bleak winter months, it would be insanely expensive (think triple the system costs). It’s much more cost-effective to size your solar array to be effective most of the year, but let the generator take over in the winter.
-
 Obstructions
Solar panels work best in full sunlight, so you want to keep them free from obstructions that would cast shade on the panels. Check your build site for trees, chimneys, or anything else that could block sunlight from hitting your panels.
Keep in mind that shadows get longer in the winter as the sun takes a lower arc across the sky. Make sure that your build site will be free from shade all year-round.
If partial shade is unavoidable, the impact can be mitigated with micro-inverters or power optimizers. However, they won’t match the output of an array built with full exposure to sunlight.
-
 Orientation
Solar panels produce the most power when they face directly toward the sun, which takes a path in the sky that follows the Equator. So if you live in the Northern Hemisphere, you want to face your panels due South. In the Southern Hemisphere, face them North.
As you select a build site, make sure you can face your panels in the right direction. If you don’t have a suitable space on your rooftop, consider a ground mount away from obstructions to get the most out of your panels.
-
 System Voltage
Solar batteries come in a variety of voltages, including 6V, 12V, 24V and 48V.
We recommend a 48V DC battery bank simply because it’s the most efficient and cost-effective option available. At lower voltages, you will need to buy more electronics and invest in more cabling to handle the higher amperage from the system (the amperage is doubled every time the voltage is cut in half).
In an off-grid residence, 48V is the better option. For best results, it is most common to use 6V batteries and wire them in series for a total of 48 volts.
Determine Your Energy Needs
There are three key factors to consider when sizing an off-grid system:
- Peak power demand
- Daily kWh usage
- Nightly kWh usage
(“KWh” stands for kilowatt-hour, the standard measure of how much electricity your appliances consume while in use. You can find this rating on the appliance’s EnergyStar sheet.)
To start, make a list of each appliance’s wattage consumption. Then write down how many hours you plan to use each appliance on a daily basis. This information is necessary to move forward with the sizing process.
off-grid load calculator
We’ve got a handy off-grid load calculator to help you keep track of your appliance’s wattage consumption.
Off-grid load calculator >>Important! 1,000 watts = 1 kilowatt. Be sure to convert watts to kilowatts before you make your kWh calculations, or your numbers will be off!
What is Your Peak Power Demand?
What are the electrical loads that you will need to run? Will they all run at the same time, or can you rotate the loads?
Your peak power demand is your total wattage usage when you are running all the electrical loads you need simultaneously. By staggering usage of major appliances at different times, you can reduce your peak power demand and bring system costs down.
Figure out how many appliances you expect to run at the same time, and add up their wattage consumption. The total is your peak power demand. Make note of this number, as we’ll be using it to figure out your inverter size.
What is your daily kWh usage?
Using the load evaluation worksheet you filled out, multiply the appliance wattage by the number of hours it will be in use each day. As an example, if you run a 1,500-watt dishwasher for 30 minutes each day:
1,500 watts x 0.5 hours = 750 watt-hours (Wh)
Remember to divide by 1000 to convert from watts to kilowatts.
750 Wh / 1000 = 0.75 kWh daily usage
Repeat this step for each appliance you will use, and tally them all up to get your daily kWh usage. Write that number in your notes.
What is your nightly kWh usage?
In the daytime, the power you use comes straight from your solar panels. When the sun goes down and panels are no longer generating power, the battery bank takes over and your appliances will run off of stored energy.
Using the same method as above, add up the appliances you’ll use at night and tally them here. Your fridge, TV, and smartphone charger are common appliances that run in the evening and overnight. Your inverter also has a self-consumption rating (the amount of power it takes to run the inverter) which should be accounted for.
Well-designed off-grid homes can use as little as 3-4 kWh per night, but yours may be higher if you want to run power-intensive appliances in the evening, like an HVAC system.
Tally up your nightly kWh usage and write the number down in your notes.
Off-Grid Battery Bank Sizing
With the above figures in hand, we’re finally ready to begin our system sizing calculations. We’ll start with the battery bank, which needs to be sized to accommodate both peak and continuous demand.
For the purpose of demonstration, we’ll walk through the math for a sample off-grid system with the following energy needs:
Peak Power Demand |
6 kW |
Daily kWh usage |
20 kWh |
Nightly kWh usage |
4 kWh |
Site Location |
Los Angeles, CA |
Daily minimum sun hours |
4 |
Panel orientation |
South |
Obstructions/shading |
none |
Battery bank type |
Sealed lead-acid |
System voltage |
48V DC |
Some energy is lost through the act of charging and discharging the battery bank. We need to leave a little extra room in the battery bank to account for the inherent inefficiencies in the charge cycle.
For lithium batteries, multiply by 1.05 to account for a 5% loss during the charge cycle. In our example, we use sealed lead-acid batteries which are closer to 20% inefficient, so we’ll multiply by 1.20 to compensate:
20 kWh/day x 1.2 = 24 kWh/day
2. Days of AutonomyFor off-grid residential systems, we recommend sizing your system to complete one charge cycle per day to keep system costs down.
If you need more days of autonomy, take your result from the previous step and multiply by the number of days you’d like the system to run before you need to recharge your battery bank.
This is not cost-effective for off-grid homes, so we’ll skip the step in our example. However, it would make more sense in remote industrial applications -- for example, an array powering remote telecom equipment. In these cases you may want several days or weeks of autonomy if the system is not being monitored, in which case you can factor it in here.
24 kWh/day x 1 day of autonomy = 24 kWh
3. Depth of DischargeSo far, we have measured how much energy storage capacity we need to supply one day of power to the property. However, if we build a battery bank to match that capacity, we’d be completely exhausting our batteries each day, which isn’t healthy for them (it shortens their lifespan significantly and voids the warranty).
To properly care for the battery bank, we need to account for depth of discharge (DoD) -- the amount of battery capacity which is used before recharging. For sealed lead-acid batteries, 30% is recommended. Anything beyond the 50% mark will significantly overwork the batteries and shorten their lifespan.
Lithium batteries are more lenient; they can safely reach 80% DoD.
To keep things simple, we will use a multiplier of 3 for this calculation. That triples our energy storage capacity, so that when we use our 4 kWh per night, we discharge one-third or 33.3% of the battery bank capacity.
(A multiplier of 2 accounts for a 50% DoD. Anywhere between 2-3 is fine, with the caveat that deeper DoD leads to shorter battery lifespan.)
Note: use your nightly kWh figure here, not the daily kWh we have used in previous steps. We’re calculating how much energy needs to be stored in the battery bank to meet nightly kWh demands.
4 nightly kWh x 3 (DoD compensation) = 12 kWh storage in battery bank
4: Selecting BatteriesWe have arrived at our target battery bank capacity for our example: 12 kWh. Now it’s time to figure out how many batteries we need.
Things can get a bit confusing here, as sealed battery manufacturers introduce a different unit of measurement for battery capacity: the amp hour. This measures the battery current over time. Amp hours are calculated as follows:
Watt-hours ÷ Battery Bank Volts = Amp-hours (Ah)
We’ve determined that we need 12 kWh, or 12,000 watt-hours of storage in the previous step, so we can divide by the battery bank voltage to get our target amp-hour capacity.
For this system, we’re aiming for a 48V battery bank (standard in off-grid residential applications), which is typically accomplished with eight 6V batteries wired in series:
12,000 Wh ÷ 48V = 250 Ah minimum battery bank capacity
We’re not done yet! This is the minimum battery capacity needed to cover our nightly kWh usage, but we still need to check compatibility with our chosen inverter.
The inverter will be rated for a minimum battery bank size. If you don’t meet that minimum requirement, the inverter will overload the battery bank with power from solar, and you will have too much amperage coming into the batteries. This is a surefire way to fry your battery bank in a hurry.
For reference, all of our off-grid kits above 2kW demand at least 415Ah of capacity from the battery bank. So the 250Ah figure we calculated above falls short of the inverter requirements; you’ll need a 415Ah battery bank to be compatible with the inverter.
Note that a nightly demand of 7 kWh / night at 30% DoD crosses this minimum threshold for compatibility with the inverter:
7 kWh x 3 = 21kWh battery bank
21,000 Wh / 48V = 437.5 Ah
In a scenario like this, it is ok to use a 415 Ah battery and increase the depth of discharge, so long as you don’t cross the 50% threshold.
Once you cross that 415 Ah @ 50% DoD threshold, that is when you would need to add a second string of batteries and boost the system up to 830 Ah of storage capacity.
One final note here: the amp-hour rating of a battery changes based on the discharge rate. For the purposes of off-grid solar, we want the amp-hour rating at a C20 discharge rate.
C20 just means that the batteries will discharge over a 20-hour period, which is perfect for solar. With a 20-hour discharge and 4-hour recharge, we complete one full charge cycle in a 24-hour period. Be sure that you are looking at the C20 capacity rating as you select your batteries.
Lithium batteries are rated in kilowatt-hours, the same measurement we used to determine nightly energy usage. Since our sample system is designed around 4 kWh per night, and we can go to 80% DoD with lithium batteries, our battery bank math would be:
4 kWh x 1.25 (DoD compensation) = 5 kWh storage in lithium battery bank
Lithium batteries follow the same rules with regards to inverter compatibility and minimum battery bank size. For example, a system with a Sol-Ark inverter and Fortress battery bank requires 3 batteries with 5.4 kWh capacity apiece, for a total storage capacity of 16.2 kWh. (Again, this may sound like overkill, but it’s necessary to assure the battery can safely handle the charging amperage from the inverter).
Solar Panel Array Sizing
Fortunately, the process for sizing your solar panel array is a lot simpler. Start with your daily kWh usage and divide by sun hours in your location.
Note: for these calculations, use the initial figure for daily kWh usage, not the number from the battery bank calculations. In our example, that’s 20 kWh/day.
20 kWh/day ÷ 4 sun hours = 5 kW solar array
From there, we need to add a bit of overhead to account for inefficiencies and degradation rate of the panels.
The output of solar panels drops slightly each year, which is outlined by their performance warranty. If your solar panel’s performance warranty guarantees 80% performance after 25 years, then their degradation rate is calculated as 20%/25 years, or 0.8% production loss each year. By the end of its lifecycle, a 400W rated panel would only output 320 watts.
In addition, solar panels are tested in ideal conditions -- a temperature controlled lab with nothing obstructing the panels. In the real world, solar panels often fall short of these lab-tested conditions, meaning they produce a bit less power than their wattage rating.
Because of these factors, we budget extra solar capacity so that we reach our target production figures after accounting for the inefficiencies of the system.
20% is a good amount of headroom to account for inefficiencies. Multiply your solar array size by 1.2 to account for this:
5 kW x 1.2 = 6 kW solar array
Pretty simple, right? We need 6kW or 6,000 watts of solar to meet our daily needs. From there you can figure out how many solar panels you’ll need based on the wattage of the panel. For example, 16 of these 400W Phono Solar panels would make a 6,400 watt array, which is enough solar for our purposes.
It’s smart to invest in 1-2 extra solar panels for your array, just to shield against inherent inefficiencies and give a bit of cushion in case your energy needs increase in the future. Solar panels are the least expensive part of the system, and an extra panel or two can keep you covered on days of heavy usage.
For these reasons, our final recommendation for this example system would be one of the following configurations:
6.4 kW array: 16 Phono Solar 400W solar panels
6.2 kW array: 20 Phono Solar 310W solar panels
Off-Grid Inverter Sizing
With the battery bank and solar array sizing squared away, we have enough information to pick a compatible inverter.
This is where your peak power demand comes in. Inverters are rated for the amount of continuous power they can process. If you have an 8 kW inverter, then you can run appliances that consume up to 8,000 watts of power at the same time.
In our example system, we determined that our peak power demand was 6 kW, so we would look for an off-grid inverter that is at least that large. It’s ok if the inverter nameplate rating is a little larger than your peak demand, as that gives extra headroom for heavy usage days.

Off-Grid Solar System Installation
Once the system has been designed and your solar kit has been purchased, you’ll need to figure out how to install it. You have two options: hire a local installer or install the system yourself.
In our experience, people who live off the grid love to take the hands-on approach and opt for a DIY installation. For those folks, we want to give a quick overview of the installation process so you know what to expect.
We won’t be able to go into specific detail about wiring and system layout, because every off-grid system is configured differently, and the installation instructions change based on the components in your system. However, we can provide a broad step-by-step outline to give you a sense of what to expect during a DIY install.
If you purchase your off-grid solar kit from GoGreenSolar, we provide a detailed custom planset and full installation instructions for your project. Take a look at the sample off-grid installation guide below to get a sense of what resources will be available to you during the installation.
To get started, here’s an overview of what’s involved in an off-grid solar installation:
1. Battery Bank
The battery bank should be installed in a well-ventilated and temperature controlled enclosure, like a garage or a shed. Very hot temperatures shorten battery life, while cold temperatures reduce battery capacity and make charging more sluggish.
75°F is a good target temperature, but batteries can work effectively in a pretty wide range of temperatures. The most important thing is to avoid prolonged exposure to extreme heat or cold, so it’s best to build an enclosure to keep them sheltered from the elements.
Note: Lithium batteries will have a specific temperature range that has to be adhered to, and they are generally not as tolerant to colder (sub-freezing) temperatures.
Quick Tips
- Aim for 75°F ambient room temperature.
- Leave at least 1” of space between each battery to allow them to properly cool.
- Make sure the room is well-ventilated, as there may be some offgassing as a natural part of operation.
- Keep a notebook nearby. You’ll want to test your batteries regularly to keep track of the health of your battery bank.
Once the battery bank enclosure is prepared, you can wire up your battery bank. The wiring schematics will be provided with your owner’s manual and it is just a matter of following the diagrams.
Off-grid battery banks almost always contain several smaller batteries wired in series. For example, it’s common to wire eight 6V batteries in series for a total battery bank voltage of 48V. There will be diagrams clearly showing each connection point, so pay close attention to the labels and you’re good to go.
A few general battery bank wiring tips:
Quick Tips
- Keep the battery bank as close as possible to the inverter. Longer wiring runs are susceptible to voltage drop (a slight loss of efficiency as current travels through the wire).
- Cables should be the same length and thickness. Mismatched cables lead to imbalanced charging.
- Use clips or zipties every 1-2 feet to keep the wiring organized.
- Keep wires clear from the ventilation system so they don’t get damaged.
- Double-check that all connections are well torqued. Loose connections can melt terminals/breakers and present a fire hazard.
2. Racking
Next, it’s time to install racking that will hold your solar panels in place.
With roof mounts, your rafters provide a foundational structure to support the weight of the solar array.
The first step is to locate and mark the layout of your rafters. The easiest way to do this is to look for exposed rafter tails underneath the edge of your roof.
If your rafters aren’t exposed, you can locate them by knocking on the surface of the roof with a rubber mallet and listening to the sound it makes. A hollow sound means there is no rafter underneath. When you locate a rafter, you will hear the sound change to a dull, heavy thud.
You can also buy a stud finder, or locate the rafters inside your attic and drill pilot holes that go through to the roof. The flashings for the racking system will cover up the holes you drill.
Once you have located your rafters, mark them with a chalk line (available for about 5 bucks at your local hardware store). These lines will mark the layout for your racking rails.
With the layout marked, the next step is to install flashings by drilling them into the rafters at the marked locations. The flashings should be spaced so that there are two rails supporting each row of panels (one near the top and one near the bottom). Your install guide will have the spacing measurements depending on the size of your solar panels.
With flashings installed, it’s fairly simple to bolt down the racking rails to the flashings. You may need to cut the rails with a heavy duty table saw so that they don’t hang past the edge of the array.
Lastly, the array will need to be grounded. The ground wire will typically start on the end of a rail and go into a junction box, where it is routed through conduit back to the power center.
All wiring should be lifted off the surface of the roof to comply with electrical safety codes. Use wire clips or zipties to pull wires tight enough that they won’t sag and touch the roof.
Ground mounts require the construction of a dedicated metal foundation to support the weight of the array. There are extra costs and more labor involved with installing ground mounts, as you will need to dig holes 4-6 feet deep and fill them with concrete to create a sturdy base for your system.
You will need to rent heavy-duty digging equipment to accomplish this. The digger will also be used to create a wiring trench, as you will need to bury your wires running from the array to the inverter underground.
The ground mount process looks something like this:
- Dig foundational holes.
- Set the support beams in the holes and fill concrete around them.
- Allow time for concrete to set.
- While you wait, dig the wiring trench to your inverter location.
- Once concrete sets, install racking rails on the support beams.
Beyond the need to build concrete footings and a structure to support the array, the rest of the ground mount install process mirrors the roof mount instructions above: affix the racking rails to the foundational structure, secure panels to the rail connectors, and run a grounding wire from the frame of the array to the ground.
3. Solar Panel Array
Once the racking has been built, installing solar panels is fairly straightforward by comparison. There are mounting holes on the back of the panels, which line up to bearing points on your racking. If your racking is properly spaced according to your planset, it is simply a matter of aligning the panel’s mounting holes close to the rail bearing point and bolting them down.
If you are installing panels on your roof, be sure to hook up the connecting wires before bolting the panel to the racking rail, as the connection point on the back of the panel will be inaccessible once it is installed in place.
4. Power Center
Your power center is the “brains” of your system. It contains the inverter, charge controllers, surge protectors, monitoring system, and AC/DC inputs.
The power center is pre-wired so that you don’t have to worry about connecting the smaller components of the system together. It’s a bit like going under the hood of your car: while it’s nice to know what’s in there, you won’t need to connect all the individual components to get a working off-grid system. The power center is already assembled for you, which saves a lot of headaches during installation.
The power center should be mounted close to the battery bank. A longer wiring run between the inverter and the battery bank leads to efficiency losses as the current travels through the wire. Mount the power center in an easily accessible location as close to the battery bank as possible. (This will be accounted for in the design process, so the mounting location will be diagrammed out in your planset.)
Once it’s mounted on the wall, you are ready to wire everything together and hook it into the inputs on the power center.
5. System Wiring
Once the racking, battery bank, solar panel array and power center have been installed, it’s finally time to wire everything together.
It’s a bit challenging to give generic wiring advice here, as every off-grid system will have different demands based on the unique combination of components involved. Your planset will contain a detailed wiring diagram that shows wire gauge, length, and connection points for every single wire and cable in your system.
Using the wrong size wire will throw off your battery charging calculations, so pay close attention to the wiring specifications in your planset.
6. Programming and Commissioning
With your system components fully installed and wired together, the last step is to program the battery charging profile. This outlines the system’s voltage set points to ensure your system follows a healthy charge and discharge cycle.
These values will be outlined in your planset, and you’ll be able to punch them in either through a smartphone app, or on the digital display of the power center itself.
Programming includes setting the following values:
Bulk Voltage |
A strong current to refill battery bank as quickly as possible (below 80% state of charge) |
Absorb Voltage |
A slower charge rate as batteries top up from 80-100% state of charge. |
Float Voltage |
A small trickle charge to keep batteries at full capacity |
Absorb Time |
The length of time the charger spends in the absorb phase. |
AC Input Amps |
The input amperage from your generator (or the grid in hybrid systems) to ensure the total load doesn’t exceed the size of the breaker. |
Max Charge rate |
Limits the output of the battery charger so the battery bank isn’t overloaded with charge current. |
Temperature compensation |
Adjusts charge rates based on ambient temperature. Batteries charge slower in the cold, so this adjusts the charge rate to compensate for temperature changes. |
Maintenance & Care
Your off-grid solar system will require occasional maintenance and care to keep things running smoothly. Here’s what we recommend:
Cleaning your solar panels
Dust and debris can settle on the face of your solar panels, which will impact the output of the system if your panels get too dirty. It’s a good idea to wipe down the face of the panels once a year or so to keep them clean. Use a soft-bristle brush or cloth so that you don’t scratch the glass face of the panels. Window washing equipment works great for this.
In snowy climates, you’ll likely need to commit to more frequent cleanup, as snow buildup can obstruct the panels. Brush off snow as often as necessary to keep the face of the panels clear.
Battery maintenance
Though sealed batteries are often described as “maintenance free,” that’s not quite true. While you don’t need to constantly refill them with water to keep them operational (as is the case with flooded batteries), they still require a monthly maintenance check to make sure everything is in order.
Once a month, complete the following tasks to take care of your sealed battery bank:
Use a multimeter to measure the battery bank state of charge. Note the voltage readings down in a battery maintenance log. Voltage readings that drift away from their target set points can indicate when a battery is failing to hold a charge.
- Check for loose connection points and re-tighten wires if necessary.
- Wipe any dust and grime off the batteries to keep the connection points and case of the batteries clean.
Solar Calculator

Which Solar Kit Do I Need?
GET STARTED WITH SOLAR
WE’LL HELP YOU FIGURE OUT YOUR SOLAR NEEDS!
Fill out the form for a complimentary solar quote that includes a custom satellite layout, system design and a breakdown of total project cost and estimated savings.